Sunday 29 October 2017

Review: BeautyMaker Perfect Concealer Palette + Photoshop Perfecting Concealer Brush

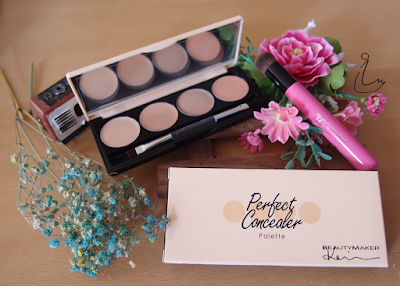
BeautyMaker Perfect Concealer Palette + Photoshop Perfecting Concealer Brush
Being troubled by dark circles and need urgent coverup before you find a solution to cure it? Introducing, BeautyMaker Perfect Concealer Palette and Photoshop Perfecting Concealer Brush. Your dark circles life saver!

I have tried this super great concealer palette and brush lately from BeautyMaker. I really fall in love with it. It covers my dark circles very well. The finishing looks so natural, like I never did apply concealer. It is easy to use too and works well with other makeups.  Most importantly, it last long without the need to touch up. 

The brush is soft and perfect for concealer application.

About Perfect Concealer Palette and Photoshop Perfecting Concealer Brush
Perfect Concealer Palette
Benefits:
  • Create smooth, even make-up base.
  • Instantly covers dark circles, discoloration and other imperfections.
Texture: weightless, creamy

Colors: 4 base color. 
About Perfect Concealer Palette.

Photoshop Perfecting Concealer Brush
Feature:
  • Rounded dense brush head.
Benefits:
  • Precise application of dark circle area, blemishes, spots and pores.
  • Suitable for applying highlighter and contour products. 
Design:
  • Designed to mimic your fingertips.
  • Designed to apply the perfect amount of product for maximum coverage.
About concealer brush.
How to use the Perfect Concealer Palette?
Using Instructions.
For Dark Circles
  • Use D to coverup the dark circles as base first. 
  • Then use B + A to mix into a color that match your skin and blend in.
For Spots
  • Use C to coverup the spots as based first. 
  • Then use B + A to mix into a color that match your skin and blend in.
"A" can also be use to brighten up certain area of the skin. 

How to use Photoshop Perfecting Concealer Brush?
Use it with corrector and concealer to apply, layer and blend.  

My Review
I have been having dark circles for a long time. And because I am lazy, I always use my spectacle to cover it so that it will not be that obvious. 

But still, anything related to dark circles catch my attention. Recently, I saw a video post from BeautyMaker about Perfect Concealer Palette. It really caught my attention as I too wish to have that finishing effect. 

Looking at how easy it is to apply on the video, I decided to give it a try. And I really fall in love with them. 

Come....let me introduce them to you too. 

We shall start with the Photoshop Perfecting Concealer Brush. 
Photoshop Perfecting Concealer Brush.
This brush really came handy for applying concealer. The brush is really soft and have the perfect size for applying concealer around the eye area. The brush helped the concealer to blend well. 
Small and handy.
Brush is soft and have the perfect size.
One more thing, it is easy to clean. I used a tissue to tap it clean after each use. 
With Concealer on the brush.
Alright. The moment you are all waiting for. The Perfect Concealer Palette. 
Perfect Concealer Palette.
It came pack in a beige color plastic casing. Compact and easy to bring around.
It came in a beige color plastic casing.
The palette consist of 4 colors, accompanied by an in-built mirror on the casing and a 2 sided brush. One side with flat brush and one side with pointed brush. 
Interior of the concealer palette.
For concealing dark circles, I used the Photoshop Perfecting Concealer Brush. For concealing spots, I used the given 2 sided brush in the palette. Both brushes performed well. 
2 sided brush in the palette.
From the 4 colors on the palette, color "D" is specially for covering dark circles. I use color "C" as the spots covering base. Then color "A" and "B" to blend well. 
4 colors on the palette.
The 4 colors on the palette.
It is indeed easy to use. It does cover the dark circles very well and naturally. Look at the side of my picture with the dark circles concealed. Looks totally different isn't it. Perfectly covered. 
Left side with concealer and right side without concealer.
I love it that it looks so natural. Not only dark circles, my spots or blemish nicely covered as well. It blend so well with my other makeups. 

It does made the finishing of my face looked smoother.
Before and After with other makeups as well.
And I am impressed that it lasted me throughout the day without the need to do touch up.

I did a small experiment on my hand. The happy face drawn using eye brown pencil is being concealed so well. It cannot be seen after using the concealer palette. Nicely and naturally covered.
Perfect Coverage.
I really love the concealer palette and brush so much. This is by far the best concealer I ever used. I highly recommend them to you too.
Nicely covered naturally and smoothly.

Where to buy it?
BeautyMaker Perfect Concealer Palette (S$27.90) and Photoshop Perfecting Concealer Brush (S$22.90) can be bought from BeautyMaker online store. They do have bundle sales. So do check it out. 

Where to get sample?
No Sample for these products. 

Disclaimer: Product in this post was bought for personal use only. Review is for the purpose of sharing my honest personal experience only. No sponsorship and monetary compensation are offered. 

Tuesday 17 October 2017

Review: Holika Holika Pig-Nose Clear Black Head 3-Step Kit

Holika Holika Pig-Nose Clear Black Head 3-Step Kit (1 sheet)
Having black head issue on the nose like I do? Come experience Holika Holika Pig-Nose Clear Black Head 3-Step Kit with me. 

Overall, this 3-steps kit works to remove my whiteheads, leaving my nose clean and smooth after use. However, more stubborn blackheads may need more application to be remove and each application is more time consuming then usual.

Holika Holika Pig-Nose Clear Black Head 3-Step Kit Summary
This is Holika Holika's black head removal sheets that comes in 3 steps. 

Suitable: All Skin Type

Benefits:
  • Remove most stubborn of impurities for perfect pores control. 
  • Step 1: Melts sebum and blackheads in pores.
  • Step 2: Remove blackheads and dead skin cells. 
  • Step 3: Pores tightening. Soothes pores.

How to use Holika Holika Pig-Nose Clear Black Head 3-Step Kit?
3 Steps:
  1. After cleansing, Apply step 1 to nose area and allow to sit for 15 - 20 mins to open up pores. 
  2. Dampen nose area with a bit of water and apply step 2 and let it sit for 10 - 15 minutes before removing. (Remove starting from side to middle.) 
  3. Apply step 3 to cleanse nose area. Leave on for 5 - 10 mins to minimize pores. Pat skin for better absorption. 

My Review
Blackheads is 1 issue that is forever troubling me. Especially nose area. It still look ok from far but when closed up, it looks awful. And even embarrassing when u realise that people is actually paying attention to your blackheads. 

I came across this very affordable blackhead removal sheet when browsing online store. The Pig nose and 3 steps makes me curious. Why pig nose? Because Pig nose have no black heads. 😁 This must be the first time you want your nose to be like pig's nose. 😝
Holika Holika Pig-Nose Clear Black Head 3-Step Kit.
I have tried 1 step removal but never 3 steps. This curiosity is enough for me to put this product in the shopping cart. 

First step is to put a serum sheet around the nose area to melt off sebum. There are lots of serum in the pack. Serum is watery and not sticky. But I do feel a little itchy during application.
Step 1.
Step 1 mask sheet.
Serum is watery and non sticky.
Step 1: during application.
Next came the usual sticky pad. It came pasted on a plastic transparent sheet. 
Step 2
Sticky Pad.
It came pasted on a plastic transparent sheet.
It does fit to my nose very well. And the sticky pad became harden by the time it is ready to be removed. 
Fit to my nose very well.
There are indeed quite a number of whiteheads being pulled out. Nose area became smooth to touch. 
Whiteheads being pulled out.
I really like it when mask sheet is given to help tightened the pores. I do not need to separately prepare the mask sheet. Save my time. 😀
Step 3
Step 3: Mask Sheet
The mask sheet is place between a white plastic sheet and a net. The serum on the mask sheet is thick and sticky. 
The mask sheet is place between a white plastic sheet and a net.
Serum on the mask is thick and sticky.
It feels really cooling during application and it is very slippery too as it kept on dropping.
Mask sheet feels slippery.
During application.
This mask does really work to an extend. It feels clean and smooth after used. But very stubborn blackheads needs more application I think. As just 1 application cannot remove them. 

Also 3 steps means more time is needed to use them. It actually needs the time of mask application X 3. So you may want to apply it when you are not so busy. 😜😝
Before and after use.
Overall, I am satisfy with this 3-step kit.

Where to buy it?
Holika Holika Pig-Nose Clear Black Head 3-Step Kit can be bought from Althea Online Store. It was S$2.40 at time of review.

Where to redeem sample?
No sample for this product.  

Disclaimer: Product in this post was bought for personal use only. Review is for the purpose of sharing my honest personal experience only. No sponsorship and monetary compensation are offered.
Sunday 8 October 2017

Review: YSL Temps Majeur Creme Intensive Skin Supplement

YSL Temps Majeur Creme Intensive Skin Supplement (5ml sample)
Let's discuss about YSL Temps Majeur Creme Intensive Skin Supplement today. 

Overall, this creme might not be suitable for my skin as I see no effect after using them. However, it is really generous for YSL for giving such big bottle of sample to try given that it is an expensive product.

YSL Temps Majeur Creme Intensive Skin Supplement Summary
This is a prestigious face care treatment by YSL.

Suitable:
  • All Skin Type
Benefits:
  •  Trigger intensive restructuring action to regain skin youth. 
  •  Reduce skin inflammation, puffiness, wrinkes and free radical damage.
  • Skin look radiance, toned, supple, smooth and hydrated. 

About the product.
How to use YSL Temps Majeur Creme Intensive Skin Supplement?
Apply morning and evening over face and neck.
Ingredients.

My Review
Already. This will be a backdated review. Let's see if I can still remember my after used experience. 

Kind of forgot how this bottle of sample came into picture. But it is quite a big bottle of sample given that this product is quite expensive. 
Generous Sample Size.
Not sure it is to be use as a treatment cream or just as a moisturiser in the skin care regiment. But I use it as a moisturiser.

The creme has a light creamy texture. I thought it will be oily given that it is use for anti aging. But it turns out alright to me. At least my face do not produce pimples during the period of using it. 
Creamy texture.
Lightweight and not oily.
However, I did not see any improvement to my skin during the period of using. Maybe my skin is not really that bad to see improvement in the first place. 😜

But one thing I must say is that this product is not within my budget. Too expensive for me to own 1. 😞

Where to buy it?
Not really sure where to buy this product. Should be available at YSL Store. Saw it at Lazada SG as well but out of stock. Heard that it is quite an expensive product. :(

Where to get sample?
Sample redemption is long over. No sample redemption that I know at the moment. 

Disclaimer: Product in this post was given for personal use only. Review is for the purpose of sharing my honest personal experience only. No sponsorship and monetary compensation are offered.